2015 July: Day trip to climb Brinkley Bluff, West Macdonnell National Park, NT, Australia
Prolog
Section 4 of the well-known Larapinta Trail is from Standley Chasm to Birthday Waterhole. The trail passes through Brinkley Bluff, 1209 meters, on the Chewings Range, West Macdonnell National Park, NT.
Brinkley Bluff, along with Mt Gillen & Mt Sonder are the mountains that I wish I had climbed 3 years ago when I was here in the West Macdonnell National Park for Mt Zeil.
I ticked off Mt Gillen & Mt Sonder in the past 2 days, and so, I am glad to finish off the trifecta by climbing Brinkley Bluff today.
The scenery all the way to Brinkley Bluff is sheer magnificent. Even though the centre of Australia is a desert, but the folded mountains of the West Macdonnel Ranges is beautiful beyond belief. No wonder so many people are willing to undertake the arduous 220-km journey of the Larapinta Trail.
Today's trip with David is from Standley Chasm to Brinkley Bluff and back again.
By the way, photos and write ups on the Mt Gillen & Mt Sonder climbs are in my blog:
- Mt Gillen: http://mntviews.blogspot.com.au/2015/07/mt-gillen-nt-australia.html
- Mt Sonder: http://mntviews.blogspot.com.au/2015/07/mt-sonder-nt-australia.html
Map
Below is 1:250,000 scaled Hermannsburg SF53-13 map
- The red arrow on the left points to Birthday Waterhole.
- The foot track from Standley Chasm to Birthday Waterhole is section 4 of the well known Larapinta Trail represented by the black dash line.
- We park our car at Standley Chasm, at where the red pin is. Then cut directly west to meet up with the Larapinta Trail.

GPS tracklog files & Route
Our GPX tracklog files can be downloaded from:
• From Standley Chasm carpark to Brinkley Bluff summit:
https://drive.google.com/file/d/0B877-h5SCJaSYzhJckhXd1VCZjg/view?usp=sharing
• Return from Brinkley Bluff summit to Standley Chasm carpark:
https://drive.google.com/file/d/0B877-h5SCJaSTXhOT2wzREpZb0E/view?usp=sharing
Below is our route to Brinkley Bluff in a Google Earth tilted view. (North is towards the top right hand corner.) To enlarge the pic, click on it.
- Our GPS tracklog is in turquoise colour.
- Standley Chasm is at the bottom right hand corner.
- Brinkley Bluff is at the end of the tracklog near the top of the pic.
- The 3 arrows point to (from top to bottom): Reveal Saddle, Bridle Path Lookout, and lookout near Standley Chasm.
- The green lines are the boundaries of the West Macdonnell National Park.

- The 1st part of our route is along a dry creek bed.
- 2nd part of the route is along the ridge top of Chewings Range.
In summary, our route is:
- Start at Standley Chasm carpark.
- Go west to a nearby lookout (bottom arrow of the above pic)
- Join up with Larapinta Trail at the dry creek
- Follow the Larapinta Trail all the way to Brinkley Bluff summit.
- Retrace steps back to the car.
Timeline & Distance
08:06 0.0 km Start walking from Standley Chasm carpark
Looking for a short cut which will meet up with the Larapinta Trail.
08:15 0.4 km At gate to Standley Chasm kiosk
08:24 0.8 km At junction of detour to lookout
08:27 0.9 km At lookout
08:29 0.9 km Leave lookout
08:32 1.0 km Back at detour junction
08:39 1.2 km At junction of short cut (to Standley Chasm) and Larapinta Trail (a dry creek)
09:08 2.8 km Larapinta Trail leaves dry creek (but we keep going on the dry creek)
09:31 3.6 km Leave dry creek to meet up with Larapinta Trail
10:09 5.0 km At junction of detour to Bridle Path Lookout
10:14 5.2 km At Bridle Path Lookout
10:20 5.4 km Back at detour junction
10:33 6.0 km At Reveal Saddle
10:34 6.0 km Leave Reveal Saddle
10:53 6.8 km Stop for Morning Tea
Morning Tea
11:04 6.9 km Resume walking
11:59 9.3 km At false summit
12:23 10.4 km At Brinkley Bluff summit
Lunch
13.22 10.4 km Leave summit
13:48 11.6 km At false summit
15:15 14.8 km At Reveal Saddle
15:28 15.3 km At junction of detour to Bridle Path Lookout
16:07 17.6 km Larapinta Trail enters dry creek
Afternoon Tea
16:15 17.6 km Resume walking
16:47 19.1 km Leave Larapinta Trail (the dry creek) and head directly to Standley Chasm
16:54 19.4 km At junction to lookout
17:06 19.8 km At Standley Chasm carpark
==============================================
Total: 9 hrs exactly at leisurely pace. (You should be able to complete the trip faster than us.)
19.8 km Distance is from Google Earth
22.3 km Distance is from Garmin GPS
Pictures - To false summit
1) On the access road to Standley Chasm, I snap this shot through the car windscreen. Initially I thought the mountain pointed to by the red arrow is Brinkley Bluff. But upon consulting the map and Google Earth, it is actually Mt Conway - pretty handsome looking! Would love to climb it one day.

2) Standley Chasm has only one main building, a kiosk cum gift shop operated by the Angkerle aborigines (upper photo). It is at the bottom of an imposing red cliff.
The red Hyundai at the carpark is our hired car.

The start of the Larapinta trail to Brinkley Bluff is about 500 meters down the road south of the Kiosk. Rather than walking the 500 meters, we take a short cut through the back (west side) of the kiosk. The short cut will eventually meet up with the Larapinta Tail.
3) Halfway through the short cut is this detour to a lookout. From where I'm now standing to the top of the hill is about 200 meters.

4) From the top of the lookout are these mountains surrounding Standley Chasm. The red arrow points to where you can see the kiosk if not for the trees.

5) From the lookout towards the south ~~~
Click on the photo to enlarge it and you can just see the access road towards Standley Chasm.

6) Around the lookout are plenty of this plant. Seems to be a Hovea, native to Australia. If you know its name, please let me know.

7) We've met up with the Larapinta Trail. As mentioned earlier, the 1st part of the trail to Brinkley Bluff is along a dry creek bed.

8) The further upstream we go, the rougher the creek bed becomes.
At this point, I realize the Larapinta Trail must have exited the dry creek earlier on and is now on top of the cliff on the right side of this pic.

9) Looking for a way to climb up the cliff to meet up with the Larapiinta Trail ~~~
The cliffs are vertical ... we are trapped in the creek :-)

Eventually we are able to find a cliff face with some handholds to allow us to climb out of the dry creek ... phew ... what a relief !
10) Although we are out of the creek, we are still in the same valley ... now heading upward towards Reveal Saddle.

11) Prior to reaching Reveal Saddle, there is a detour to Bridle Path Lookout. (Just a short detour, about 200 meters to the lookout.)

12) These photos are taken from the Bridle Path Lookout.
- The upper pic is towards roughly west; towards where we are meant to go. Our trail is actually not up this valley, but on top of a ridge further to the right of the photo.
- The lower pic is towards roughly east, towards where we came from. Earlier on, we had walked along the valley and the dry creek there.

13) After Bridle path Lookout, the next land mark is Reveal Saddle ~~~
Here and the next 3 photos are the scenery around the Saddle.

14) At Reveal Saddle we have our first glimpse of Brinkley Bluff summit, the red arrow.

15) Zooming in on the left side of the previous pic ~~~
This nice scenery is towards south-east.

16) Still around Reveal Saddle ~~~
- The red arrow points to Brinkley Bluff summit. Although the peak to its right seems higher, But the peak pointed to by the red arrow is actually higher by about 50 meters.
- The yellow line and arrows show the trail towards the mountain. (Click on the pic to enlarge it.)

17) Now leaving Reveal Saddle ~~~
This scene is towards the north. But we are not going there ... we are heading west.

18) Further along the trail ~~~
The red arrow points to Brinkley Bluff summit.

19) Towards the north and north-west ~~~
The dark mountain range across the middle of the photo is like a submerged crocodile with its back and head raised above the water :-)

20) Closer to Blinkly Bluff ~~~
- The red arrow points to Brinkley Bluff summit. Although the peak on its right seems higher, let me call it the false summit, but the real summit pointed to by the red arrow is actually higher by about 50 meters.
- The yellow line and arrows indicate the trail up the mountain.

21) This and the next set of photos show the rocks we walk on ... they are jagged and sharp. If you walk here when the weather is hot, they will melt your shoes :-)

22) The sharp rocks we walk on

23) Red cliffs that we walk pass

24) A different view of Blinkley Bluff ~~~
The true summit is not visible here, hidden behind the false summit.

25) Getting closer to the false summit. The true summit is not visible here.

26) Closer still to the false summit.

27) The false summit is right in front.

To real summit
28) After climbing over the false summit, Blinkley Bluff summit is back in view.
The next high peak near Brinkley Bluff is Paisley Bluff, pointed to by the red arrow.

29) David leading the way to the summit

30) Closer to the summit now ~~~
The red arrow points to Paisley Bluff.

31) Almost there ... the cairn is in front.

32) David and I make it to the summit ! 1209 meters.

33) Seems that some people just want to make their mark here. So they erected this little cairn nearby! (The shadow of the big cairn is at the lower right hand corner.)

34) The 360 degree panoramic view from the summit is superb. Towards the west is Paisley Bluff, the nearest named high mountain to Brinkley Bluff.

As time goes by, one expects the to-do list to be getting shorter and shorter. But mine is getting longer and longer :-) Today, I ticked off Brinkley Bluff, but added Mt Conway and Paisley Bluff ... sigh !
35) From the summit, towards the east ~~~
- The gap pointed to by the left red arrow is Reveal Saddle. Standley Chasm, where we came from, is 5 km behind it.
- The right arrow points to Mt Conway ... would love to climb it one day :-)

36) Zooming in to the left side of the previous photo, the beautiful Chewings Range ! ~~~
- Reveal Saddle is the gap at the top right hand corner of the pic.
- On the way back, we'll walk along the ridge top of the dark green range starting from the left edge, across the pic towards Reveal Saddle.

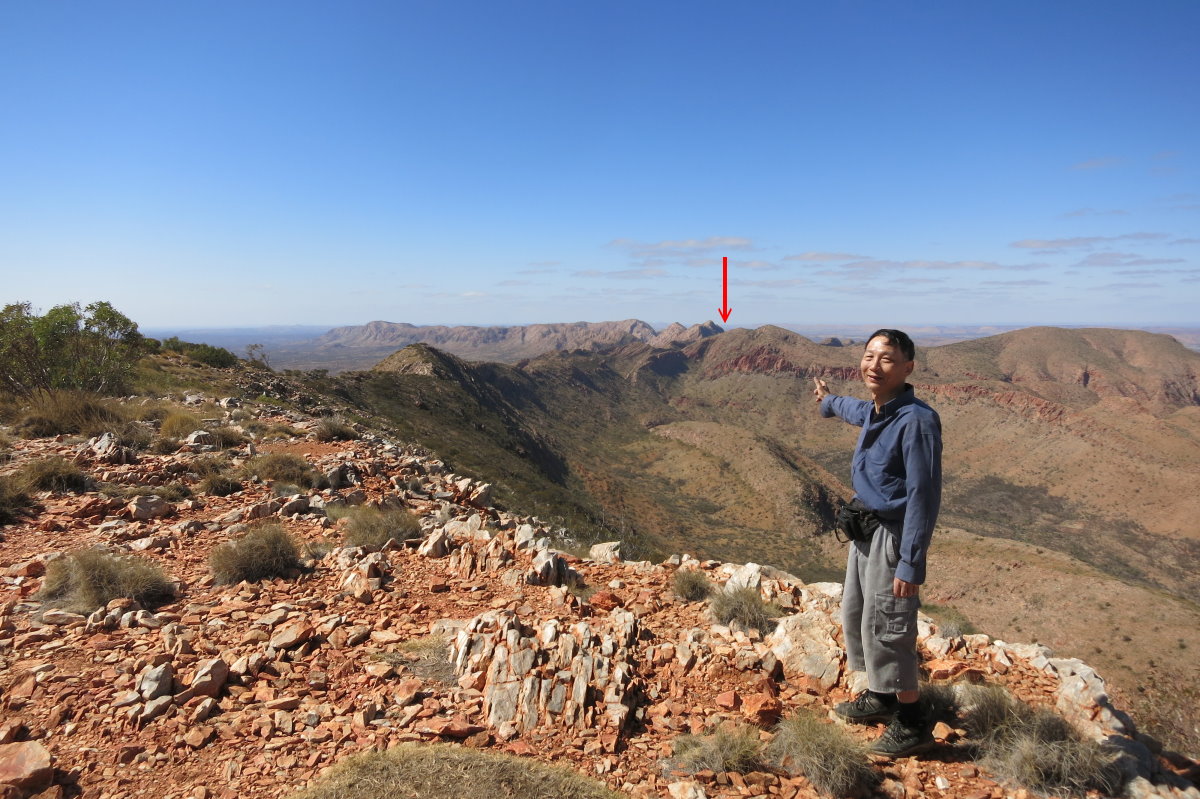
37) Still at the summit ~~~
I am pointing to Reveal Saddle, the red arrow. Standley Chasm, where we came from, is 5 km behind the saddle.
38) Google Earth tilted view from the summit (our GPS tracklog is in turquoise colour) ~~~
Compare this pic with the previous pic ... they show identical land features at slightly different elevations. My point is ... why bother to climb up a mountain when you can get the same view from the comfort of your own home using Google Earth??? Someone calls it lounge room ascent :-)

39) Near the summit, David with his sharp eyes spots this good looking Ctenophorus caudicinctus (Ring-Tailed Dragon).

Return to Standley Chasm
40) Descending ~~~
The return trip is just as rewarding ... you get a different view of the fantastic scenery ...
- Standley Chasm, where we came from, is 5 km behind the gap pointed to by the red arrow.
- The dark mountain range across the middle of the photo is like a submerged crocodile with its back and head raised above the water

41) Descending ~~~
- The left red arrow points to the false summit. We need to climb over it.
- The gap pointed to by the middle arrow is Reveal Saddle. Standley Chasm is 5 km behind it.
- The right arrow points to Mt Conway.

42) We've climbed over the false summit of the previous photo ~~~
- The gap pointed to by the left red arrow is Reveal Saddle. Standley Chasm is 5 km behind it.
- The right arrow points to Mt Conway.

43) The Chewings Range extends right across this photo.
Section 3 of the Larapinta Trail (Jay Creek to Standley Chasm) goes through part of the top of the Chewings Range in this photo.

44) Still descending ~~~
- The yellow arrows point our way back to Reveal Saddle, the gap pointed to by the red arrow.
- Standley Chasm is 5 km behind the gap.

45) The yellow line is our route to Reveal Saddle.

46) Scenery near Reveal Saddle

47) At Reveal Saddle - this scene is similar to those in Photos #14 & #15

48) We've passed Reveal Saddle, but not too far from it.

49) Upper pic: At the detour to Bridle Path Lookout - compare this pic with photo #12.
Lower pic: Further down the valley after passing the detour to Bridle Path Lookout.

50) Now back down to the dry creek which we had walked along this morning. The blue triangle pinned to the tree is a reassuring sign that we are on the Larapinta Trail.

51) We'll soon be back at our car ... the kiosk in Standley Chasm is at the centre of this pic.

52) We are at the back of the kiosk in Standley Chasm ~~~
This tree is Corymbia aparrerinja (Ghost Gum) - correct me if I'm wrong. It looks so artificially white, as if someone had put a coat of white paint on it

No comments:
Post a Comment