2016 November: Day walk - Tidbinbilla Mountain & The Pimple, in Tidbinbilla Nature Reserve, ACT, Australia
Prolog
I have been to the nearby Tidbinbilla Peak one and a half years ago in 2015-05. On that trip I ran out of time to climb Tidbinbilla Mountain. And ever since then, Tidbinbilla Mountain has been near the top of my to-do list. I am glad to have it ticked off today with AB as company. (AB had a surgery to his foot which was damaged in a football accident. This is his first big walk after the surgery. For the record, his foot holds up marvellously.)
By the way, photos and trip report to Tidbinbilla Peak (plus to Camels Hump and Johns Peak) are in my blog:
http://mntviews.blogspot.com.au/2015/05/camel-back-johns-peak-tidbinbilla-peak.html
Tidbinbilla Mountain & The Pimple
Tidbinbilla Mountain :
- Elevation: 1615 meters,
- Highest peak in Tidbinbilla Range
- It is a steep climb from the carpark to the top.
- Note: Not to be confused with Tidbinbilla Peak which is just under 2 km (as the crow flies) north-east of Tidbinbilla Mountain
The Pimple :
- Elevation: 1462 meters
- About 1.3 km (as the crow flies) north of Tidbinbilla Mountain
- It is a stand alone rocky peak. When you walk towards it from Tidbinbilla Mountain, it looks like a pimple, well, a large one :-)
- There are some dense scrubs you need to bash through to get to The Pimple ... not pleasant :-)
Maps
- 8627-2S Tidbinbilla 1:25,000
- Rooftop's "Namadgi - ACT South Activities Map" 2011 edition; 1:50,000
- 8627 Brindabella 1:100,000
Here is the 1:25,000 scaled map of the relevant part of today's walk.

GPS tracklog file & Route
Our GPX tracklog file can be downloaded from:
https://drive.google.com/file/d/0B877-h5SCJaSbU5LZUhONkVoQjQ/view?usp=sharing
The same tracklog, red colour, superimposed on the 1:25,000 scaled map:
(Scroll forward to the satellite image for more comments on the route.)

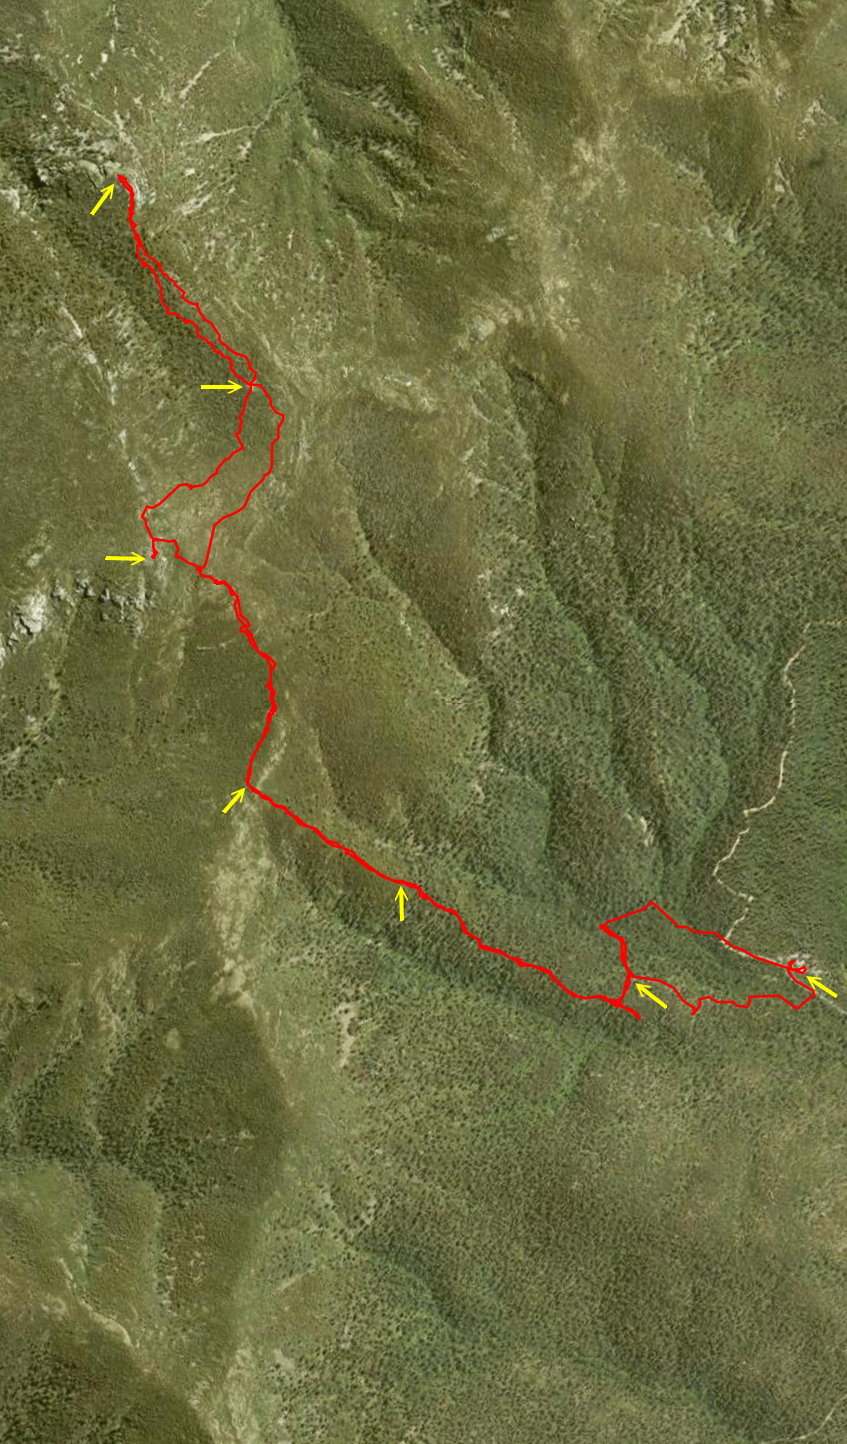
Satellite image of the tracklog in red ~~~
- Lyrebird circuit trail is to the left of Mountain Creek Carpark
- 7 yellow arrows, from top to bottom and left to right:
• The Pimple summit
• Open rocky slab (photos #30 and #31)
• Tidbinbilla Mountain summit
• Where the uphill climb meets the ridge of Tidbinbilla Range (the cairn in photo #10)
• Chair and bench (photo #8)
• Leave Lyrebird trail here
• Where my car is parked (at Mountain Creek carpark in Tidbinbilla Nature Reserve)
- In the return leg:
• We bypass climbing Tidbinbilla Mountain
• Take the north branch of Lyrebird circuit to the carpark
A summary of our route is:
- Start at Mountain Creek carpark at Tidbinbilla Nature Reserve
- Walk along the south branch of Lyrebird Circuit Trail
- At the south-west corner of Lyrebird Circuit, go off track to climb up towards Tidbinbilla Range
- Walk along the ridge of Tidbinbilla Range to Snowy Corner
- To Tidbinbilla Mountain summit
- To The Pimple summit
- Retrace steps back to Mountain Creek carpark ... but take the north branch of Lyrebird circuit
Timeline & Distance
07:37 0.0 km Start at Mountain Creek carpark in Tidbinbilla Nature Reserve
and start to walk along the south branch of Lyrebird Trail
07:55 0.9 km At where we leave the Lyrebird Trail and head towards Tidbinbilla Mountain
Explore around to make sure we are at the correct point to leave the Lyrebird Trail.
08:04 1.4 km Start to leave the Lyrebird trail and head towards Tidbinbilla Mountain
08:57 2.4 km At a lookout with a bench and a chair (photo #8)
09:06 2.4 km Leave lookout
09:46 3.0 km At ridge of Tidbinbilla Range (There is a cairn marking this spot, see photo #10.)
10:56 4.2 km At Tidbinbilla Mountain summit
Morning Tea
11:24 4.3 km Leave Tidbinbilla Mountain summit
11:44 4.6 km Stop
AB's tummy rumbles and needs to do toilet business :-)
11:54 4.7 km Resume walking
01:11 6.0 km At the Pimple summit
01:27 6.1 km Leave The Pimple summit
01:30 6.2 km Stop for lunch
Lunch
01:53 6.2 km Resume walking
04:24 8.8 km Leave ridge of Tidbinbilla Range (same spot as at 09:46)
04:55 9.4 km At a lookout with a bench and a chair (same spot as at 08:57)
04:59 9.4 km Resume walking
05:19 9.8 km Stop walking to replace battery in GPS
Replace battery in GPS
05:28 9.8 km Resume walking
05:39 10.3 km At a lookout with a bench (a slight detour from intended route)
05:40 10.3 km Resume walking
05:48 10:6 km At Lyrebird Trail (same spot as as 08:04)
and start to walk along the north branch of the Lyrebird Trail
05:51 10.8 km Stop at a creek
Clean up ourselves at the creek
05:56 10.9 km Resume walking
06:08 11.5 km Finish at Mountain Creek carpark
==============================================
Total: 10 hrs 31 mins
11.5 km Distance is from Google Earth
14.5 km Distance is from Garmin GPS
Tidbinbilla Nature Reserve entrance gate
Mountain Creek carkpark is located within Tidbinbilla Nature Reserve. There is a gate to enter the Reserve. The gate is shut at:
- 6pm in winter.
- 8pm in summer.
Make sure you are out of the Reserve before the gate is shut.
In the event you are locked in, the ranger's phone number is displayed on the gate. At the time this report is prepared, only phones on Telstra network can get through. Although it is reassuring you'll be able to contact the ranger (if you are on the Telstra network), I wouldn't bank on him answering your phone promptly after hours. So best is not to get yourself locked in :-)
Pictures - Bogong Moth
1) A Bogong Moth in a toilet block in a service station by the side of Hume highway while I am on my way from Sydney to Canberra

Mountain Creek carpark
2) At Mountain Creek carpark, Tidbinbilla Nature Reserve ... starting point of our walk ~~~
No car is here at 7:30am, except mine.

Lyrebird Trail
3) Lyrebird Trail is a circuit. We first walk on the south branch of the Lyrebird trail. (On the return leg, we'll walk on the north branch to return to the car.)

Climb towards the ridge of Tidbinbilla Range
4) On the south-west corner of Lyrebird circuit, we go off track. But soon afterwards, we find this narrow foot track leading all the way to Snowy Corner. (Snow Corner is marked on the 1:25,000 scale map as a levelish area south-east-ish of Tidbinbilla Mountain.)

5) You can't venture into an Australian bush without encountering a termite mound.

6) Occasionally, there are ribbons tied to tree trunks/branches to guide you up.

7) There are also cairns to guide you.

8) We come to lookout with a bench and a chair in the middle of the foot track.
Who would hauled them all the way up here ? Amazing !
- Upper pic: The bench is on the downhill side (left side) of the track.
- Middle pic: (Continuation to the right of the upper pic) The yellow arrows mark out the foot track which makes a 90 degree turn at where the chair is.
- Lower pic: The yellow arrows mark out the foot track.

Just curious ... As not many people would climb this mountain, so why would anyone want to lug a bench and a chair up here?
The chair seems very new, hardly weathered. Well, obviously the ACT folks know that a VIP is coming here. So they must have installed the chair not too long ago just for me ! Thank you, ACT ! I now expect a chair to greet me half way up the next ACT mountain I intend to climb :-)
9) Foot track closer to the top of the ridge of Tidbinbilla Range ~~~
Note the thick growth of the trees on either side of the foot track. It reminds me of the trip I did with DH one and a half years ago in 2015-05. When we climbed down from Tidbinbilla Peak (the peak north-east of Tidbinbilla Mountain), we encountered the same tightly packed trees. As there was no track, we had to bash through the trees ... and we had difficulties squeezing through them. As a consequence it took us ages to come down the slope.

10) Ever since we left Lyrebird Trail, We have been climbing steadily in a north-westerly direction. This cairn marks the end of the climb. We are now on the ridge of Tidbinbilla Range. And here, we turn north, heading towards Snowy Corner.

Snowy Corner - southern end
Walking along the top of the ridge of Tidbinbilla Range, we soon come to Snow Corner. (Snowy Corner is marked on the 1:25,000 scale map as a levelish area south-east of Tidbinbilla Mountain.)
11) Southern end of Snowy Corner

12) We have a glimpse of Tidbinbilla Mountain that we'll be climbing soon.

Snowy Corner - northern end
13) Now at the northern end of Snowy Corner ... another glimpse of Tidbinbilla Mountain

14) View towards south (click on the pic to enlarge it):
- Red oval: Tidbinbilla Range
- Slanting red arrow: Corin Dam
- Vertical red arrow: Bimberi Peak
- Yellow dot: This is where we climbed up to the ridge from below. The cairn in photo #10 was taken around there.
- Yellow arrow: Once we climbed up to the ridge, we walked along the top of the ridge to here. (The ridge is also part of Tidbinbilla Range.)

15) Still at Snowy Corner ~~~
It is the end of Spring, plenty of wild flowers around.

16) Closer look at the white daisies

17) Are these flowers with a red tinge the same flower as in the above pic ?

18) If you know the name of this plant, please let me know.

To the summit of Tidbinbilla Mountain
19) Some of the cairns marking the way to the summit of Tidbinbilla Mountain

Tidbinbilla Mountain summit
20) The summit of Tidbinbilla Mountain is in sight. The red arrow points to the summit cairn.

21) Photo time at the summit cairn - 1615 meters high

The next 3 photos form a 360-degree panorama from the summit.
22) This pic is from south-east to west (click on the image to enlarge it):
- Red oval: Tidbinbilla Range
- Yellow dot: (Behind the trees) This is where we climbed up to the ridge from below. The cairn in photo #10 was taken around there.
- Yellow arrow: (Behind the trees) Once we climbed up to the ridge, we walked along the top of the ridge to here. (The ridge is also part of Tidbinbilla Range.)
- The 8 red arrows point to, from left to right:
• Mt Namadgi
• Mt Kelly
• Corin Dam (Slanting red arrow)
• Bimberi Peak (Mt Murray is behind Bimberi Peak and can't be seen from here.)
• Ginger Ale
• Mt Gingera
• Little Ginini
• Mt Ginini

23) Continuation to the right of previous pic ~~~
View from west to north-north-east
The Pimple is north of here (ie on the right side of this pic), but can't be seen from here.

24) Continuation to the right of previous pic ~~~
From north-north-east to south-east, the 4 red arrows point to, from left to right:
- Pierce Hill
- Camels Hump (or Camel Back)
- Tidbinbilla Peak (Johns Peak is behind it and can't be seen from here.)
- Mt Tennent
Continuation to the right of this pic is photo #22, thus completing a 360-degree panorama.

25) Towards north-east ... zooming on to left side of previous pic:
- Pierce Hill (left red arrow)
- Camels Hump (middle arrow)
- Tidbinbilla Peak (right arrow)
- Johns Peak is behind Tidbinbilla Peak and can't be seen from here.

26) (Continuation to the right of previous pic) Towards east ... zooming on to the right side of photo #24 ~~~
- The red arrow points to Mt Tennent.
- Tharwa and surround areas are to the left of Mt Tennent.

27) Still at summit of Tidbinbilla Mountain ... towards south ... zooming on to the middle part of photo #22 ~~~
Red oval: Tidbinbilla Range
The 4 red arrows point to, from left to right:
- Mt Namadgi
- Mt Kelly
- Corin Dam (horizontal red arrow), one of Canberra's main water source
- Bimberi Peak (Mt Murray is behind and blocked by Bimberi Peak and hence can't be seen from here.)

Climb down Tidbinbilla Mountain
28) Now leaving the summit of Tidbinbilla Mountain ~~~
- Still quite close to the summit, we get a glimpse of The Pimple ... in the red circle, directly north, partially blocked by the trees.
- The red arrow points to Cotter Dam.

29) We've climbed down Tidbinbilla Mountain, now on the lower part of its slope, and bushbashing in the direction of an unnamed minor hill (centre of this pic), 1555 meters in elevation. We won't be climbing this hill. Soon, we'll veer towards its left.

To The Pimple
30) We come to an open rocky slab.
This pic is facing up-hill. The Pimple is in the opposite direction.

31) At the same open rocky slab as the previous pic, but facing downhill in the direction of The Pimple ~~~
Yellow arrow: This is the direction we are going.

32) Shortly after leaving the open rocky slab of the previous pic, we start to get a better view of The Pimple.

33) Now along a ridge to the Pimple ... the scrub is dense along the ridge, you wouldn't know we are walking on top of it.

34) Closer to The Pimple now. The terrain becomes rockier.

35) Very close to the summit of The Pimple ~~~
AB builds a cairn.
In the lower pic:
- Left red arrow: Camels Hump (The peak to its left is Pierce Hill.)
- Right arrow: Johns Peak

36) A few more rocks to scramble over, and ...

The Pimple summit
37) ... and voilà, The Pimple summit is in front.

38) Photo time at the summit (1462 meters high):
- Upper pic: Red arrow points to Tidbinbilla Peak
- Lower pic: Red arrow points to Johns Peak

39) This is the rock we were standing on in the previous pic ... Well, it is the summit of The Pimple.
- Left red arrow: Johns Peak
- Right red arrow: Tidbinbilla Peak

40) But this rock not far from the summit has a better vantage point ...

41) ... So we pose on top of it.

42) The next 3 photos form a 360-degree panorama from the rock.
This pic is from south-south-east to north-west.
Red arrow: Tidbinbilla Mountain ... we just came from there.

43) Continuation to the right of previous pic ~~~
View from north-west to east:
- Left red arrow: Pierce Hill
- Right red arrow: Camels Hump
- The main river near the centre of the pic and flowing towards the top of the pic is Burkes Creek.

44) This pic is from east to south-south-east, and is the continuation to the right of previous pic.
- Mountain range in the background: Tidbinbilla Range (we came from that direction to The Pimple.)
- Left red arrow: Johns Peak
- Right red arrow: Tidbinbilla Peak
Continuation to the right of this pic is photo #42, thus completing a 360-degree panorama.

45) Still at the summit of The Pimple ~~~
Zooming to the right side of photo #43:
- Left red arrow: Pierce Hill (north-east)
- Right red arrow: Camels Hump (north-east)
- Left red oval: You can just make out Cotter Dam in blue ... see photo #46.
- Right red oval: Woden is in the centre of the oval ... see photo #47.

46) Zooming to Cotter Dam (north-north-east), left red oval of the previous pic.

47) Zooming to Canberra ~~~
The suburb of Woden is at the centre of the pic (towards east-north-east). Also see photo #45.

48) We make a cairn on the rock of photos #40 and #41.

Flowers around The Pimple
49) Plenty of yellow flowers around the summit of The Pimple ~~~
I don't know whether these are Daviesia (Bitter-peas) or Oxylobium ellipticum (Common Shaggy Pea).

50) This maybe Daviesia (Bitter-peas). Does anyone know the name of the species?

51) Not sure whether this is Daviesia (Bitter-peas) or Oxylobium ellipticum (Common Shaggy Pea). Please let me know.

52) This maybe Oxylobium ellipticum (Common Shaggy Pea).

Lunch near The Pimple summit
53) We have lunch in a shady area around the rocks near the summit.

Return to Mountain Creek carpark
54) Then it is retracing the steps back to Mountain Creek carpark.
Here AB is climbing down the the rocks near the summit of The Pimple.

No comments:
Post a Comment